
Harvest & Haunt Tutorial
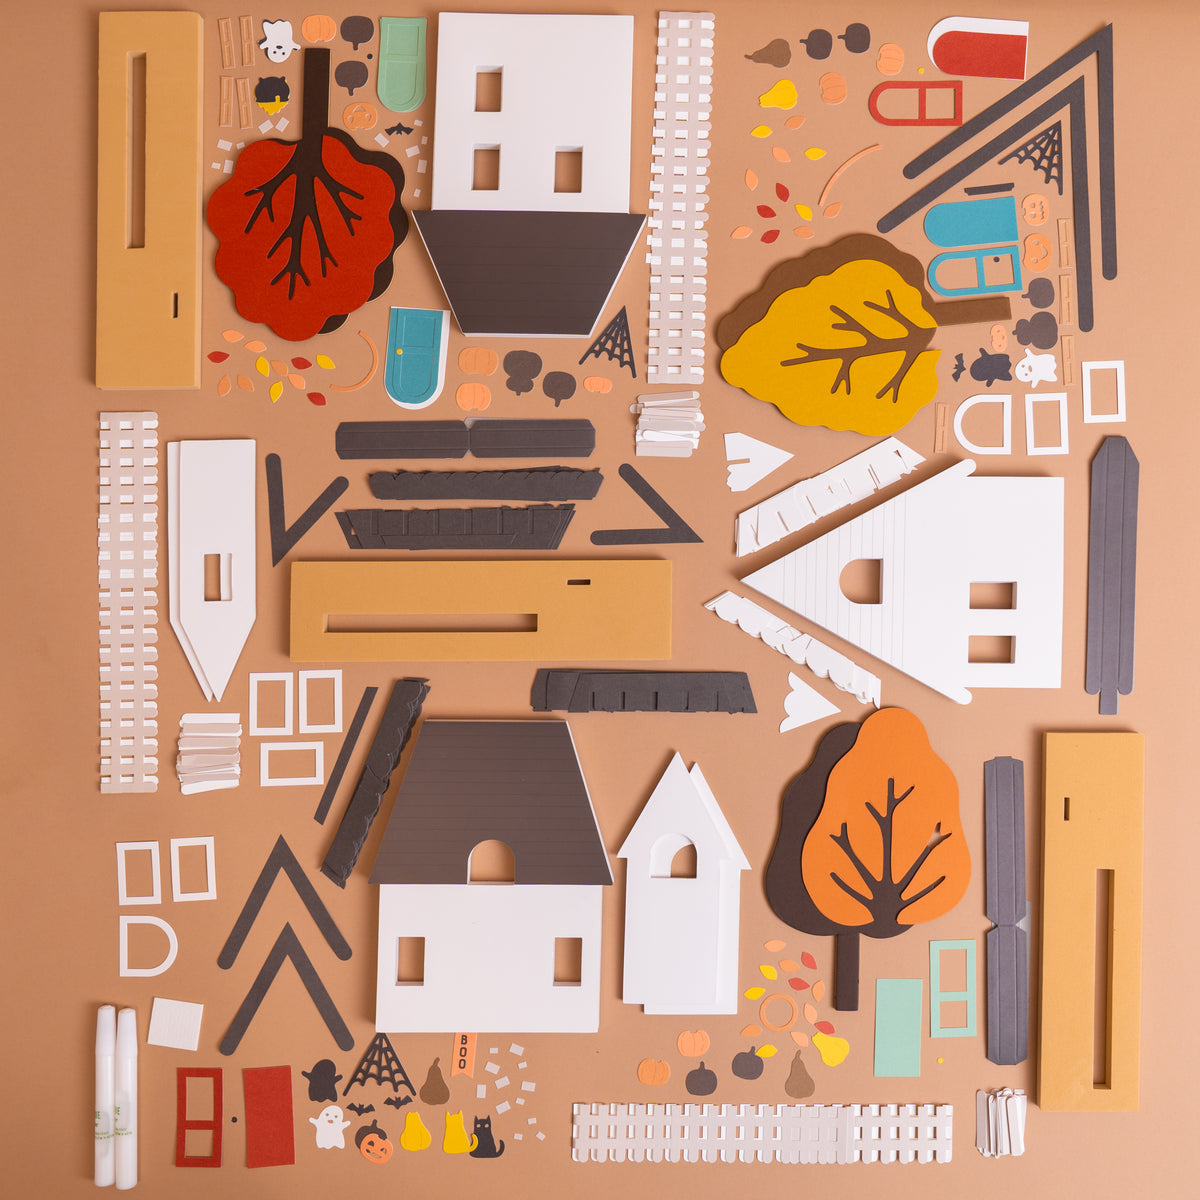
Kit Contents:
- Houses: 3
- House Facade: 4
- Tree Base & Leaves: 3
- Platform: 3
- Roof & Decor Cutouts
- Glue
- Foam Adhesives: 1 sheet
Optional supplies (not included)
-
Hot glue gun (for fences)
Instructions
Craft Time: ~ 2.5 hours
Prep Work
- Prepare the glue bottle. Open the lid, remove the stopper inside, and screw the valve cap back on.
PLEASE NOTE: Throughout this craft, apply glue lightly. A small amount is all you need.
- Remove all the bags from the box and sort them into 3 stacks - one for each house.
-
Each stack will consist of the following:
-
House Base
-
Platform & Fence
-
Fall Decor
-
Halloween Decor
-
Halloween Roof
-
Fall Roof
- Tree
-
House 1 
Attach Fall Roof Pieces and Windows:
-
Remove the house base from the bag labeled “House Base 1”
- The roof has placement guidelines on both sides. One side has THIN guidelines and the other has THICK guidelines.
- Place the house on a flat surface with the THIN roof guidelines facing UP. This will be the Fall side of the house.
-
Remove the contents of the bag labeled “House 1 - Fall Roof & Windows”.
- Locate the roof topper (labeled F1_17) and fold on all score lines.
- Turn the topper piece over so the light gray side is facing up.
- Apply a small amount of glue along the center and folded tabs.
- Stand the house upright and place the topper over the roof, folding the tabs down onto the front and back of the house.
- Hold in place while the glue dries.
-
To make it easier to see where all the pieces go, turn the shingles over so the light gray side is facing up. Arrange the pieces on a flat surface in numerical order, starting with #1 at the bottom.
-
- Some shingle layers are split into RIGHT and LEFT pieces to fit around a window.
- Please note, that RIGHT and LEFT refer to the house itself. When the pieces are laid out in front of you, they will appear opposite from your right and left.
- Each piece is labeled to identify the house, piece number, and side. For example, F1_1_RIGHT means Fall House #1, Piece #1, Right Side.
- Use the placement lines on the house base as a guide for each row of shingles. The shingles will overlap as you work your way up the roof.
-
Starting with Piece #1 at the bottom, apply a few small drops of glue and attach it along the placement line.
- Be sure to align the outer edges with the sides of the roof.
- Continue with each numbered piece, working your way upward and following the placement lines.
- After attaching all the shingles, you will have one V-shaped piece (F1_16) and 3 window pieces remaining.
- Locate one of the foam Facade pieces from the bag labeled “House Base 1.”
- Glue the V-shaped piece to the top of the white side of the Facade piece. Glue the arched window piece around the window opening. Set aside to dry.
- Glue the 2 rectangular window pieces around the windows on the house base.
Attach Halloween Roof Pieces:
-
-
Turn over the house base.
-
Remove contents of the bag labeled “House 1 - Halloween Roof”
-
Arrange the roof pieces in numerical order, just as you did for the Fall side.
-
Repeat the previous steps to attach the Halloween roof pieces.
-
Attach Facade Pieces
-
Locate both Facade pieces. The piece with the window outline goes on the Fall side; the piece without the window outline goes on the Halloween side.
-
Glue each Facade piece to the house base, using the center window to guide alignment. There will be a ½ inch of space at the bottom of the house to insert into the Platform.
-
Press firmly and hold in place for several seconds to secure.
-
Assemble Tree
-
-
Locate the bag labeled “Tree 1” and remove the contents.
-
Glue one foliage piece to each side of the tree base.
-
Set aside to dry.
-
Decorate House 1
Keep all décor above the bottom edge of the Facade piece. The bottom 1/2 inch of the house will sit inside the Platform and will not be visible.
-
Fall Side:
-
Door: Glue the teal door frame onto the door base. Add the doorknob. Glue to house, aligning the bottom of the door with the bottom of the Facade piece.
-
Pumpkin & Gourd: Glue each pumpkin and gourd to its matching brown base. Attach to the house with adhesive foam.
-
Wreath: Glue the leaves around the circular base. Attach to the door with adhesive foam.
-
Allow the glue to dry, then flip the house and decorate the Halloween side using the remaining die-cut pieces.
-
Halloween Side:
-
Door: Glue the red door frame onto the door base. Add the doorknob. Glue the completed door onto the front of the house.
-
BOO Sign: Attach to the door with adhesive foam.
-
Spider Web: Glue the spider web inside the roof peak.
-
Jack-o’-Lanturn: Glue the orange jack-o’-lantern face onto the matching base piece. Attach to the house with adhesive foam.
-
Cat: Glue the black cat on top of the yellow cat base. Attach to the house with adhesive foam.
-
Bricks: Glue the brick pieces onto the house as desired. Refer to the postcard image for suggested placement.
-
Ghost: Glue the white ghost on top of the black ghost base. Attach to the tree with adhesive foam.
-
Bats: Glue the bats onto the tree.
Assemble Fence
-
-
Locate the bag labeled “Platform 1 & Fence” and remove the contents.
-
Glue one individual die-cut picket over each picket on the fence to add dimension.
-
Wrap the fence around the Platform and bend at the corners.
-
Glue the fence onto the Platform.
-
TIP: For faster assembly, use a hot glue gun to attach the fence to the Platform.
House 2 
Attach Fall Roof Pieces and Windows:
- Remove the house base from “House Base 2” and the contents of “House 2 - Fall Roof & Windows.”
-
The side with the THIN roof guidelines is the Fall side.
-
Locate the roof topper (labeled F2_15)and fold along all score lines. Set aside until all shingle pieces are attached.
-
Lay out the shingles and follow the same process used for House 1 to attach them.
Attach Halloween Roof Pieces:
-
-
Turn over the house base.
-
Remove contents of the bag labeled “House 2 - Halloween Roof”
-
Repeat the steps above to glue on all the Halloween roof pieces.
-
Once shingles are attached to both sides, glue the roof topper in place. Fold the edges over the sides of the roof to cover the exposed seams of the white shingles.
-
Glue the large V-shaped pieces (F2_14 and H2_9) inside the roof peak on each side to finish the roof.
-
Assemble Tree
-
-
Locate the bag labeled “Tree 2” and remove the contents.
-
Glue one foliage piece to each side of the tree base.
-
Set aside to dry.
-
Decorate House 2
This house does not have a Facade piece. Insert the house into the Platform and lightly mark where the top of the Platform meets the house. Keep all décor above this line so they remain visible when the house is displayed.
-
Fall Side:
-
Door: Glue the red door frame onto the red door base. Add the doorknob. Glue the completed door onto the white arched base, then glue the finished door to the house.
-
Pumpkin & Gourd: Glue the orange and yellow pieces onto their matching bases. Attach to the house with adhesive foam.
-
Leaf Arch: Arrange and glue the leaves onto the arch base, fanning them out on both sides. Attach the finished arch at the base of the window using adhesive foam.
-
Halloween Side:
-
Door: Glue the blue door frame onto the door base. Add the doorknob. Glue to house.
-
Windowsill: Glue the windowsill at the base of the arched window.
-
Shutters: Glue each top piece with cut-outs onto a base piece. Glue the shutters to the house. For a spooky look, attach them slightly crooked.
-
Spider Web: Glue the spider web inside the roof peak.
-
Jack-o’-Lanturns: Glue the orange jack-o’-lantern faces onto the matching base pieces. Attach to the house with adhesive foam.
-
Ghost: Glue the white ghost on top of the black ghost base. Attach to the tree with adhesive foam.
-
Bat: Glue the bat onto the tree.
Assemble Fence
-
Locate the bag labeled “Platform 2 & Fence” and remove the contents.
-
Follow instructions used for House #1 fence.
House 3 
Attach Fall Roof Pieces and Windows:
-
-
Remove the contents of the bags labeled “House Base 3” and “House 3 - Fall Roof & Windows.”
-
The side with the THIN roof guidelines is the Fall side.
-
Follow the same process used for House 1 to attach the roof topper (F3_14), shingles, window frames, and Facade pieces.
-
Attach Halloween Roof Pieces:
-
-
Turn over the house base.
-
Remove contents of the bag labeled “House 3 - Halloween Roof”
-
Repeat the steps above to glue on all the Halloween roof pieces.
-
Assemble Tree
-
-
Remove the contents of the bag labeled “Tree 3”
-
Glue one foliage piece to each side of the tree base.
-
Set aside to dry.
-
Decorate House 3
Keep all décor above the bottom edge of the Facade piece. The bottom ½ inch of the house will sit inside the Platform and will not be visible.
-
Fall Side:
-
Door: Glue the blue door frame onto the blue door base. Add the doorknob. Glue the completed door onto the white arched base, then glue the finished door to the house.
-
Pumpkin & Gourd: Glue the orange and yellow pieces onto their matching bases. Attach to the house with adhesive foam
-
Leaf Arch: Arrange and glue the leaves onto the arch base, fanning them out on both sides. Attach over the door using adhesive foam.
-
Halloween Side:
-
Door: Glue the teal door frame onto the teal door base. Add the doorknob. Glue the completed door onto the front of the house, aligning the bottom of the door with the bottom of the Facade piece.
-
Shutters: Glue each top piece with cut-outs onto a base piece. Glue the shutters to the house. For a spooky look, attach them slightly crooked.
-
Spider Web: Glue the spider web inside the roof peak.
-
Jack-o’-Lanturn: Glue the orange jack-o’-lantern face onto the matching base piece. Attach to the house with adhesive foam.
-
Cauldron: Glue the black pot on top of the yellow piece.
-
Bricks: Glue the brick pieces onto the house as desired. Refer to the postcard image for suggested placement.
-
Ghost: Glue the white ghost on top of the black ghost base. Attach to the tree with adhesive foam.
-
Bat: Glue the bat onto the tree.
Assemble Fence
-
Locate the bag labeled “Platform 3 & Fence” and remove the contents.
-
Follow instructions used for House #1 fence.
Final Assembly & Display
-
Once the glue is dry, insert each house and tree into the slots of their coordinating Platform with your choice of the Fall or Halloween side facing forward.
-
To change the display, simply remove the house and tree, flip them to the other side, and reinsert them into the Platform.
Display Your Piece
Your Harvest & Haunt houses are complete! Enjoy switching between Fall and Halloween décor throughout the season.
Show off your creation! Tag us @craftedbyc9 and use #CraftedbyC9.